
After two firings, and a rebuild in the middle, building the new gas kiln was working pretty much as well as I’d hoped. As detailed in the build post, the first design was too long and colder at the burner end, so I shortened and raised the kiln chamber to match UK potter Iain Shield’s design. I also enlarged burner ports and flue to get more air going through to stop the smoking issue when I first lit the burners.
For firing No.2, after a few hours with the kiln around 100C/212F to drive off moisture, I took about 7.5 hours to get cone 9 down in the front half and cone 8 down at the back, which is pretty good and I wasn’t rushing. I had a very smooth linear temperature rise through the firing.
I think there is a little hot spot right at the front by the flames that might reach cone 10 too. One has to not put the pots too close to the flame or you may get blistering in the glazes or bloating in iron clay (which I did).
I wasn’t sure I had maintained enough reduction from 1100C/2012F, so I put it in heavy reduction at the end for 30 minutes and all pots were well reduced, bar one copper-glazed cup that had a patch of oxidation.
The key lesson learned is that one has to use glazes for the right temps in the right places. Glazes that have a wider firing range are very useful so any heat variance with positioning will still produce a matured glaze.
The ideal solution, I think, is to have glazes that have ranges good for cones 9-10 at the very front, for 8-9 in the middle, back and very top. That works as long as you get all parts of the kiln to cone 8 or higher.
One needs to fire the kiln a few times to learn how best to fire it, how to position shelves etc, and adjust accordingly.
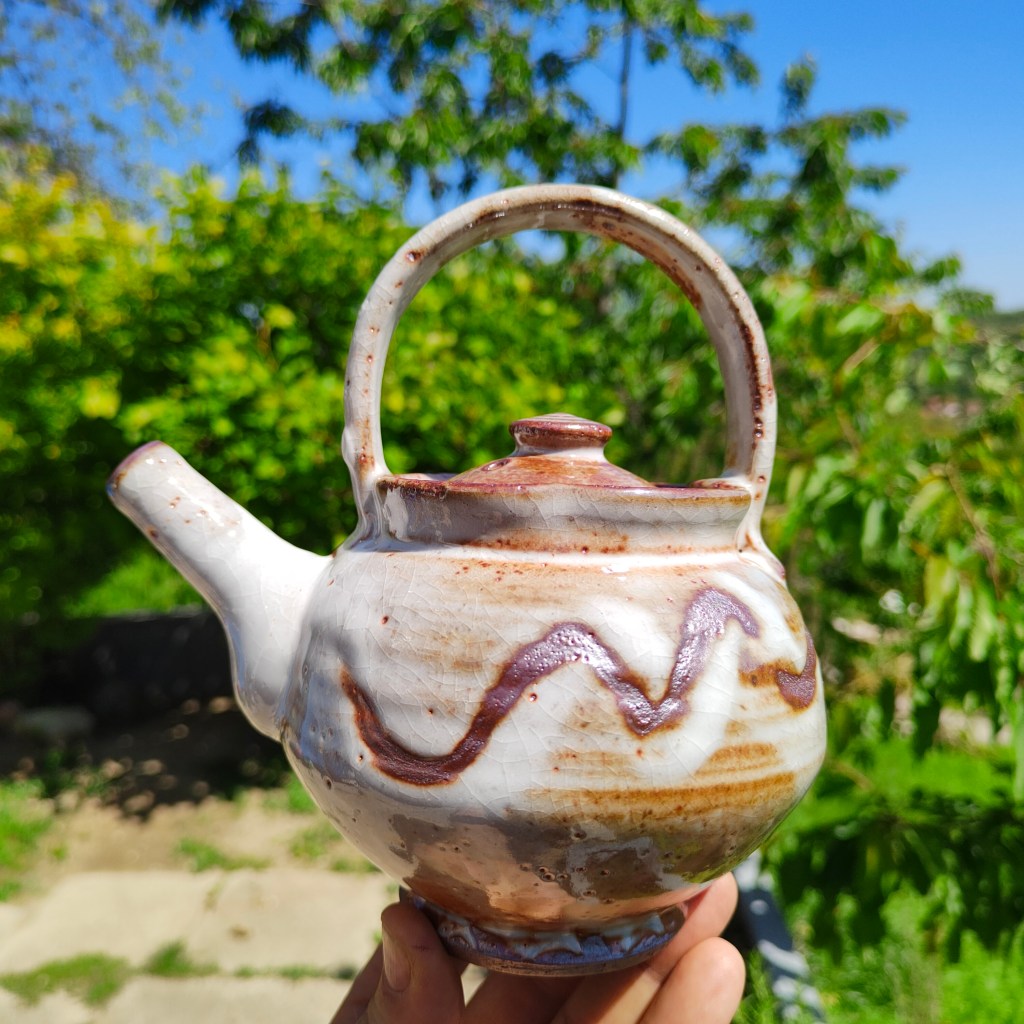
Firing No. 3: This was the best firing I’ve ever had! Most of the pots came out looking great, with just a few tests that were meh, and a few with the ash glazed pots sticking to their clay cookies after running too much.
I had actually really struggled to get the cones down during the firing, having squeezed in a little high shelf too close to the front where the hot gases enter the chamber and restricted the flow of heat through the kiln. So, the front got super hot – cone 9 was flat (I guess cone 10-11) while the cone 7/8s at the back were hardly moving. I sat up till 3am working to get those cones down and in the end they pretty much were down and my gas was running out.
(The lesson here is to make sure the shelves allow movement of hot gases around the kiln.)
The extended firing meant that even though I didn’t get cone tips quite down back and top, the glazes had well matured with heat work and nothing was underfired.
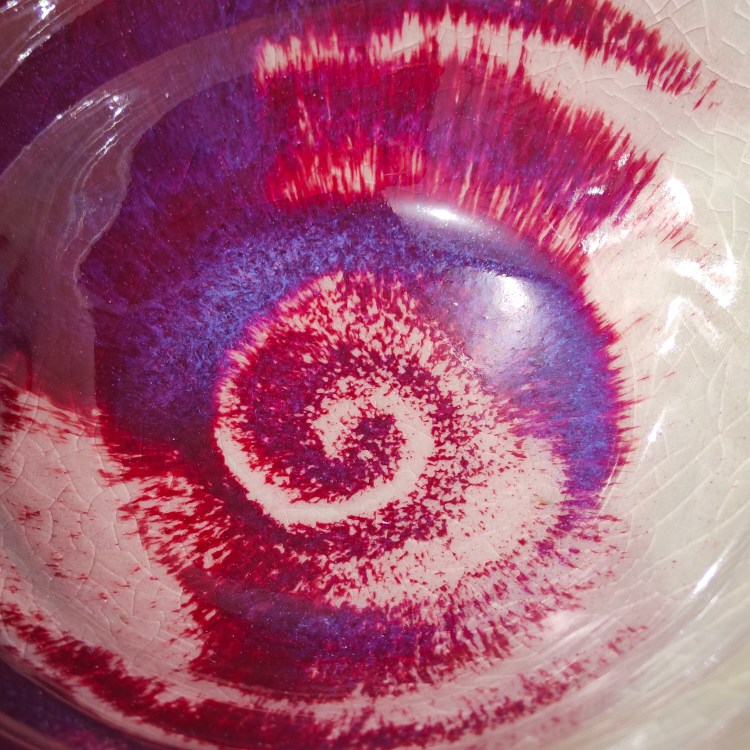
I had also lost reduction slightly at times trying to get the heat up in the later stages, but still everything did get largely reduced. Just my copper reds came out with patches of light green where they had had some oxidation. They are still beautiful.
This kiln does maintain good reduction – I think because of the floor layout. It was a mistake to go into oxidation to get more heat because I think it would have got there anyway in light reduction and the reds would have been more consistent. Even so, the results were mostly great.
As mentioned, I throw the kiln into heavy reduction at the end to try and make sure the glazes colours are as expected. However, I suspect this only works with iron-based glazes, while copper reds don’t return to red if you went into oxidation too long. That’s my theory anyway…
Firing No.4: I needed to fire a large moon jar which took a lot of the chamber height so, to make 20cm/9in space to fit a shelf above it, I added an extra layer of bricks on the top of the chamber. This brought the height to 11 bricks, when it was 10 previously.
I was a little unsure if this was a good idea, but I needn’t have been. The kiln fired as if I hadn’t added the extra layer and it all went very smoothly – 7.5 hours firing (not inc. warmup to 120C for a couple of hours and including an hour of soaking at the end). I got cone 10 down flat at the front and cone 8 getting a little squiggly at the back.
It was a little hard to get the top shelf cones down, so I kept soaking the kiln for a while. This cooler top was an issue last time I fired, so not all due to the extra layer of bricks. Or the effect was only slight. I am thinking about splitting my top shelf so hot gases can circulate more freely around the kiln and not get trapped in zones.
After unloading the kiln, I found some oxidation on the bottom rear, so it may be that the burners couldn’t make as much pressure with the extra volume (or maybe I just made a slight mistake with the damper control). Further, I had rebuilt the chimney due to robbing out insulating bricks for the extra layer on the chamber and the hard bricks I added back had slightly smaller dimensions – making for some gaps and hence a more ‘leaky’ kiln. I have tightened it up for the next firing.
After getting the kiln to where I want it, I have also just fitted steel bracing around the kiln locking all the bricks in tight. Thus, I am hoping it will be less leaky and reduction will be easier to maintain throughout the whole kiln (as well as more structurally stable, though it seemed ok without bracing).
It’s hard to be exact, but I think the extra kiln height only uses a small amount of extra gas. Maybe 2-3cm of my 10kg bottles. Overall, it takes about 20kg of butane per firing. I use 4 x 10kg bottles: starting with half-full bottles left over from the last firing, then swapping to full bottles just when I go into reduction.
I can’t do the full firing on 2 full bottles alone. There is just enough gas, I think, but the pressure drops too much towards the end. I tried in my most recent firing (Sept 19, 2025) and had to switch to full bottles at about 1150C/2100F.
Maybe if I had better burners like those from Ward or Rohde I could do it on less gas. I made mine for about 20 bucks apiece, so I am happy to use them and accept a little inefficiency.
As for why I don’t use propane: it’s hard to get the 40kg bottles around my house to the kiln on a muddy path. I have started laying a nice smooth cement paving path on which I can use a trolley. Then firing on warmer winter evenings will be possible: butane freezes around 0C, while propane freezes at -42C. That’s a huge practical difference for the potter!
I need to calculate the new chamber volume with the extra layer, and I will add that figure here soon. It’s maybe 9 cu ft/254 litres, at a guess.

I am currently making new pots for firing No. 5! Watch this space!
I have another post looking at how my pottery firing CO2 emissions compare with taking a plane or running a car and it is surprisingly little.

One thought on “First Firings in My New Gas Kiln”