Note: I have a bunch of minor but important changes to the kiln since build No. 1, and made updates to some of the sections in this post. You will need to read through the whole thing to understand what is now final kiln. Some pictures are of the first build, some are updates on my changes, so do read the captions. Updates are in italics.
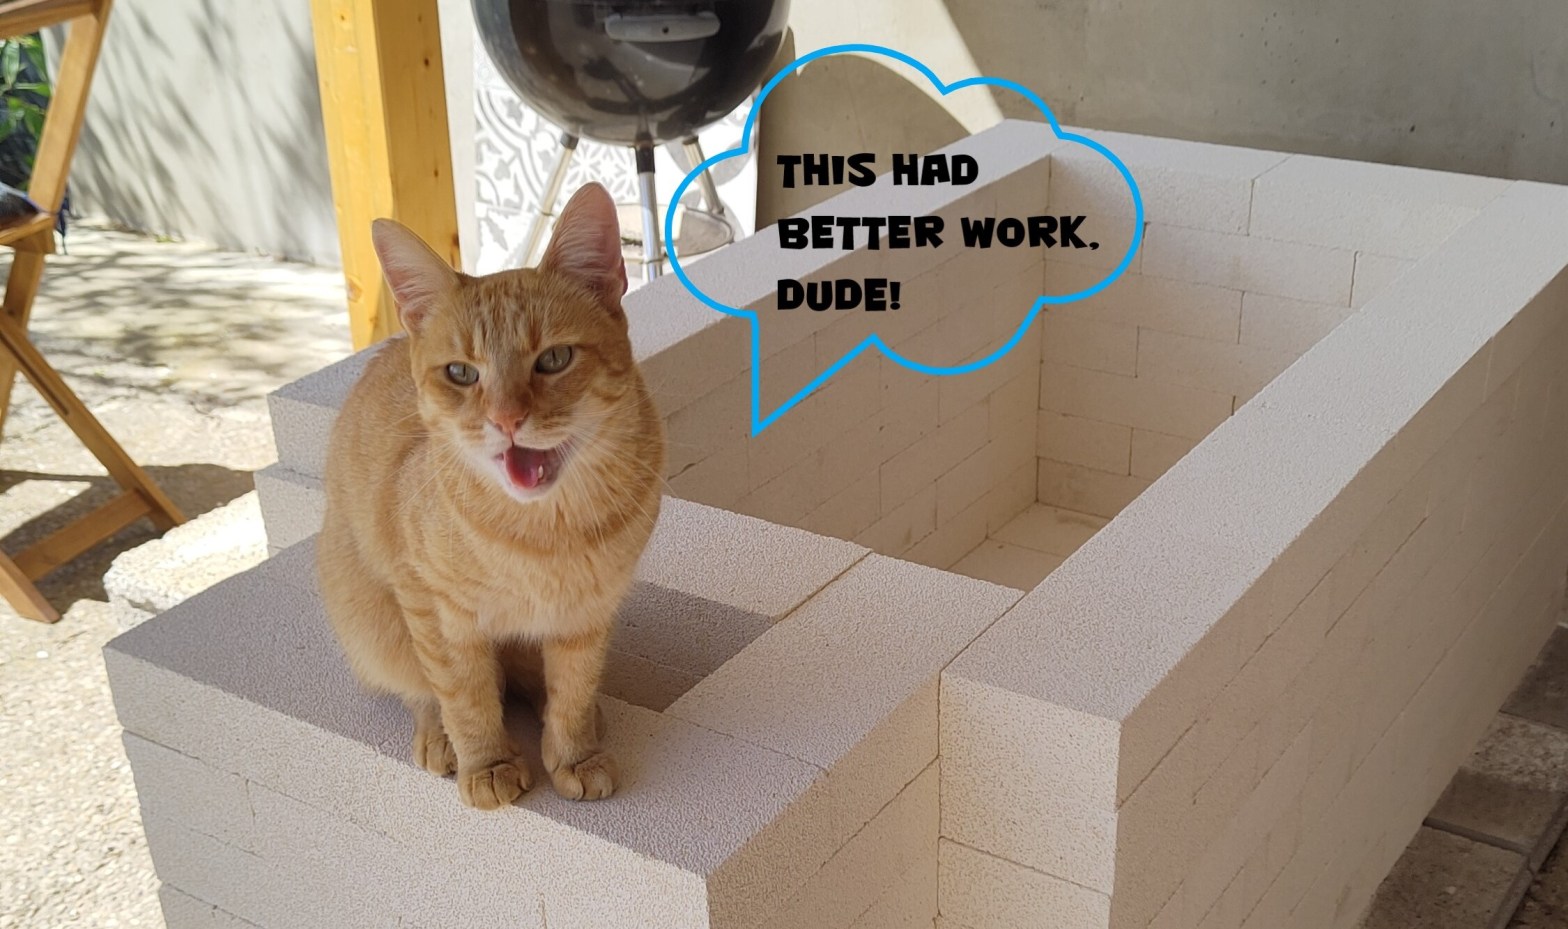
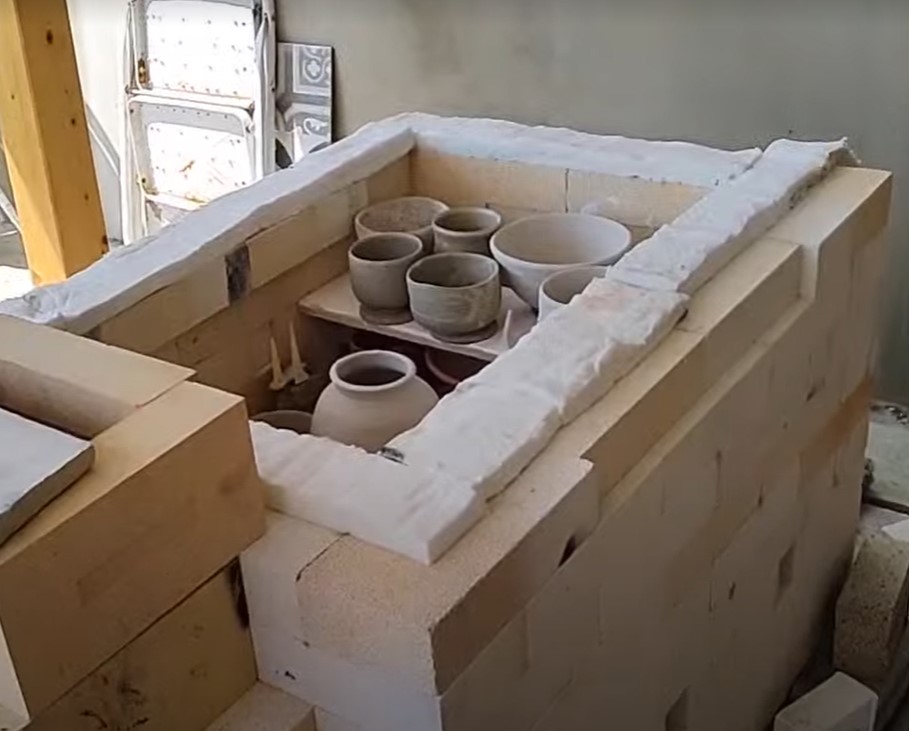
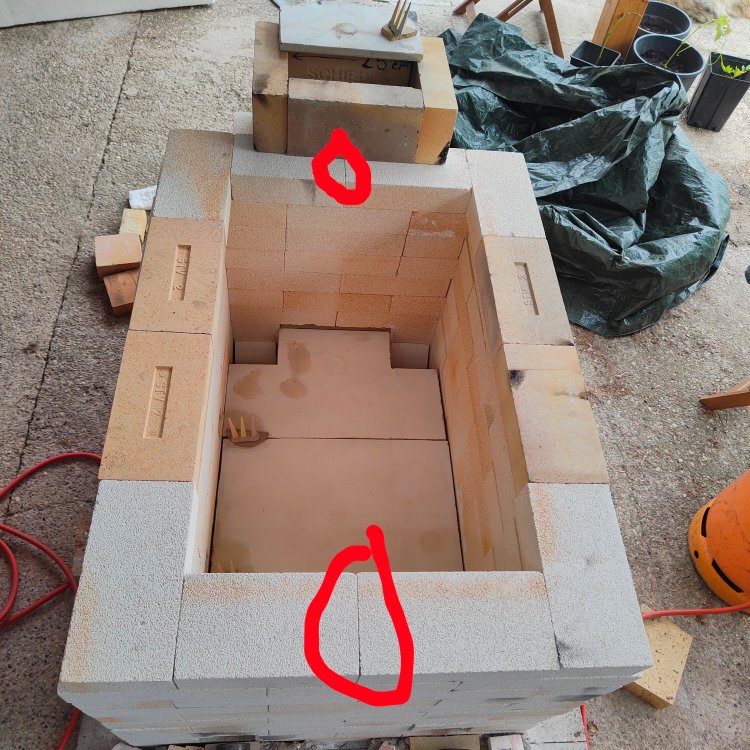
I hope it is not too confusing. You are welcome to comment or email me with questions. This first image below is the kiln ready for firing No.3, just so you have an idea.

My previous gas kiln, while it works, is somewhat frustrating. It tends to fire hotter at the bottom and cooler at the top by quite a margin. I also get some oxidation in the bottom that isn’t desirable.
So I decided to stop messing around (and weeping internally when I had to throw half my fired work onto the growing trash-pot pile) and make a new, hopefully better kiln.
At first I thought I would make it from fibre blanket. A few layers (7.5cm total) would give me a good insulating kiln, fine for cone 9 going by past experience. On reflection, though, I realised that I would do better to spend the extra cash on some insulating bricks. These are better in that they insulate really well, they provide their own support (fibre needs a framework), they don’t deteriorate anything like as quickly, and they can be reconfigured easily and quickly – or used again in future kiln projects. And they don’t have the health risks of fibre blanket.
So I arranged delivery of 150 bricks rated for 1430 degrees Celsius (2606 degrees Fahrenheit) in early April (cost 880 euros inc. delivery). I planned to fire in reduction (a carbon-rich atmosphere) to cone 9, maybe 10 if I can, for nice ash glazes, tenmokus and shinos primarily. That’s around 1260-1290 degrees C (2295-2340 degrees F).
The build
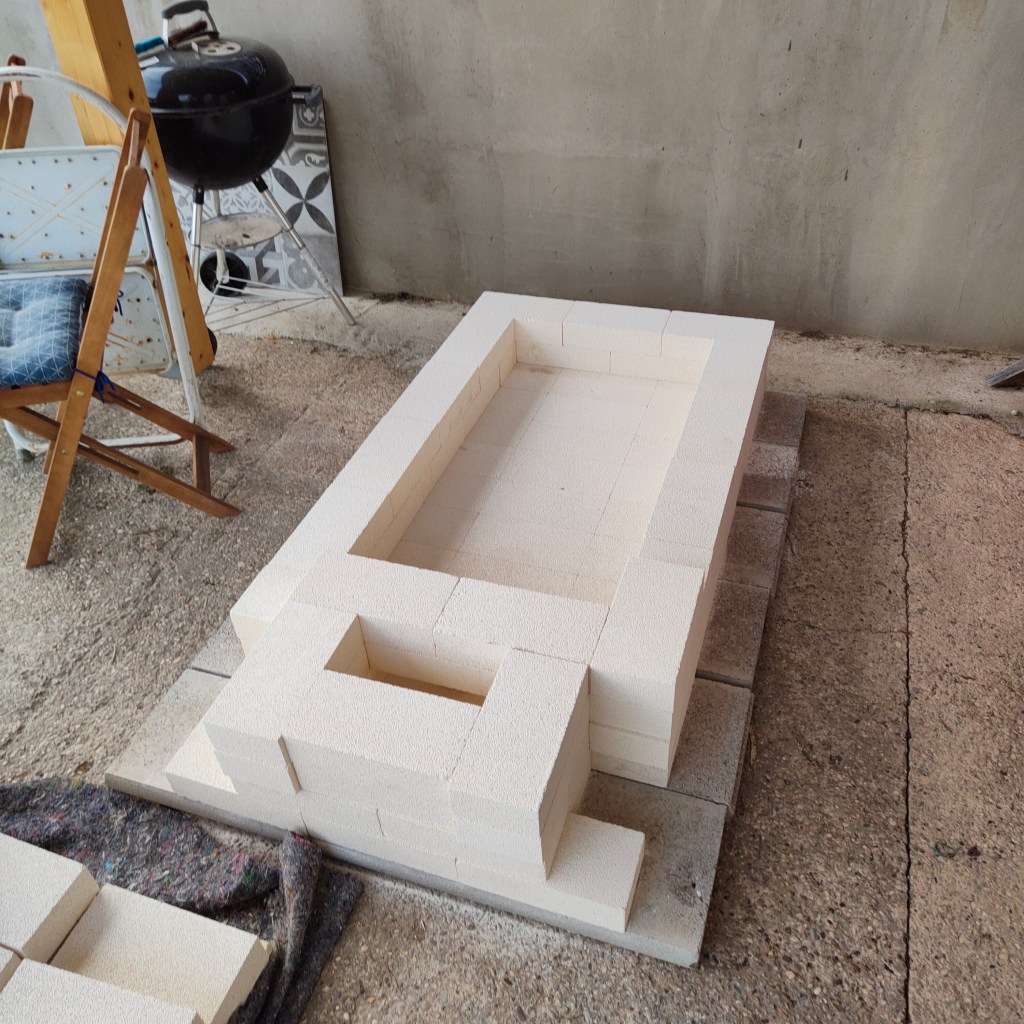
First, I laid some thin concrete blocks down as a base to protect the terrace concrete from any escaping heat. Ideally, I would have used a layer of hard high-temp bricks between the concrete blocks and the insulating bricks too, but the addition would have added another 180 euros onto the cost.
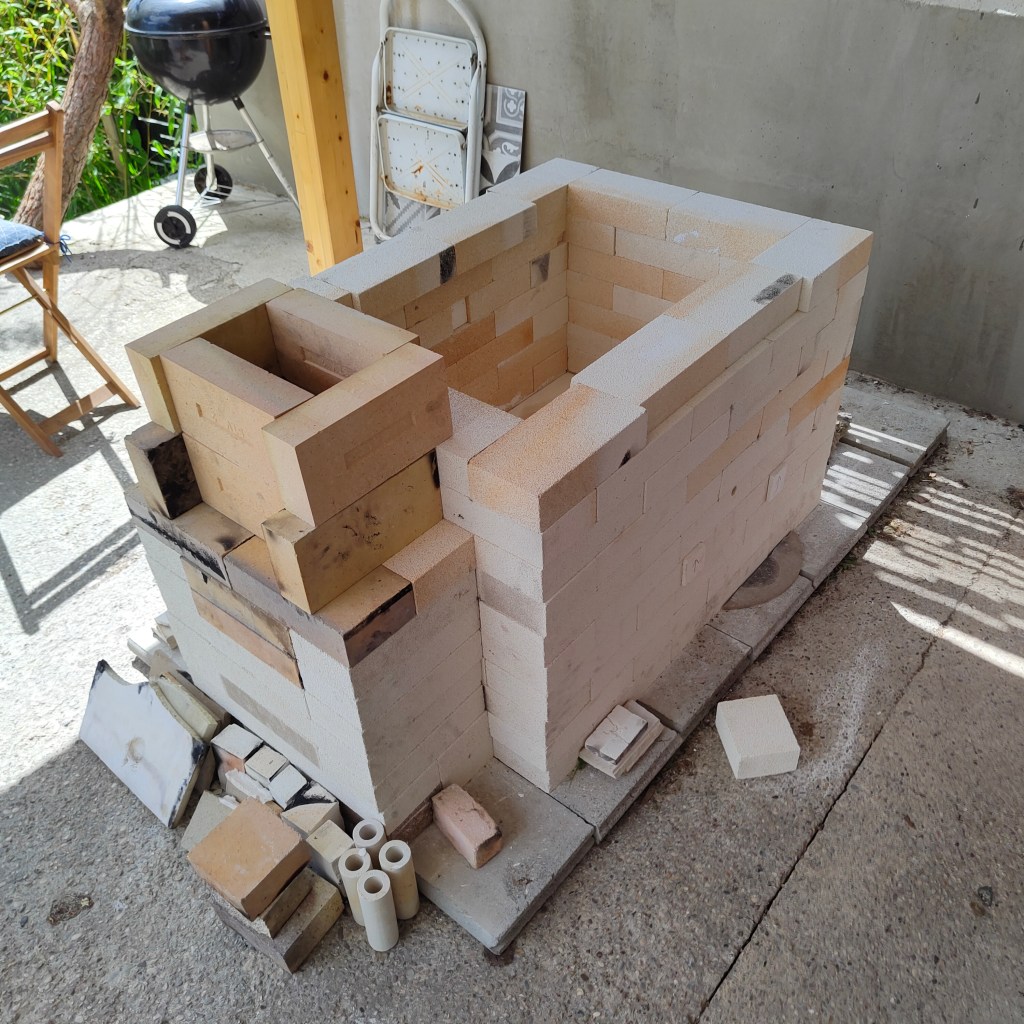
Building with bricks is very simple. It’s just like Lego play. Lay out the base layer to the floor plan you want, and build up walls in the offset-layers pattern you would use for a house wall – not forgetting to build on a chimney. One has to keep pushing the bricks together to avoid gaps and they often shift when adjusting another part. But it is easy enough to tap them back. In time I plan to add a metal frame to lock it all tight, but I want to test the format first (edit: I did do this, see the top pic).
One needs to rebuild sections when putting in the flue and ports, but on a kiln this size that literally takes a few minutes. I decided to put it up and see how it looks and work out the volume before deciding the design/cutting any bricks. With a little calculation of relative sizes, you can actually use Lego blocks to mock up the design and see how many bricks you need.
It’s worth also putting in the bottom base shelf and a couple of other shelves at sensible heights so you can see where would be the best sites for peep holes.
One needs to make sure the kiln is sited far enough away from anything flammable, of course, including decent clearance for any rafters above. I do have wood at least a metre away at the sides in the kiln’s temporary location under my veranda (I plan a dedicated shelter soon). That should be fine since the bricks insulate so well, you can touch them at high temps and not get burned. If I find the adjacent wood getting too hot, I can protect it with kiln shelves or house tiles during firings. (edit: it only gets warm and is no risk)
For my initial design, I chose to make the ware chamber two times longer than it is high to avoid the vertical temperature differences I’d had with the previous kiln (that one is a bit taller than it is long).
I made the box 3 bricks wide by 5 bricks long by 8 bricks high. That gave me a 100cm long by 50cm wide by 45cm high internal space (that’s 39.4L x 19.7W x 17.7H in inches). In empty volume, that equates to 225 litres (or 7.9 cubic feet), if I got the sums right.
The bricks are 25cm long x 12.4 cm wide x 6.4 cm high.
For this project, I was guided by builds from Iain Shields at Shield Studio Pottery. Iain makes a design very similar to what I had planned, with some key differences, and its success has seen him make kilns for other potters.
Iain builds his kilns higher and shorter than my build No. 1: 3W x 4L x 10H bricks.
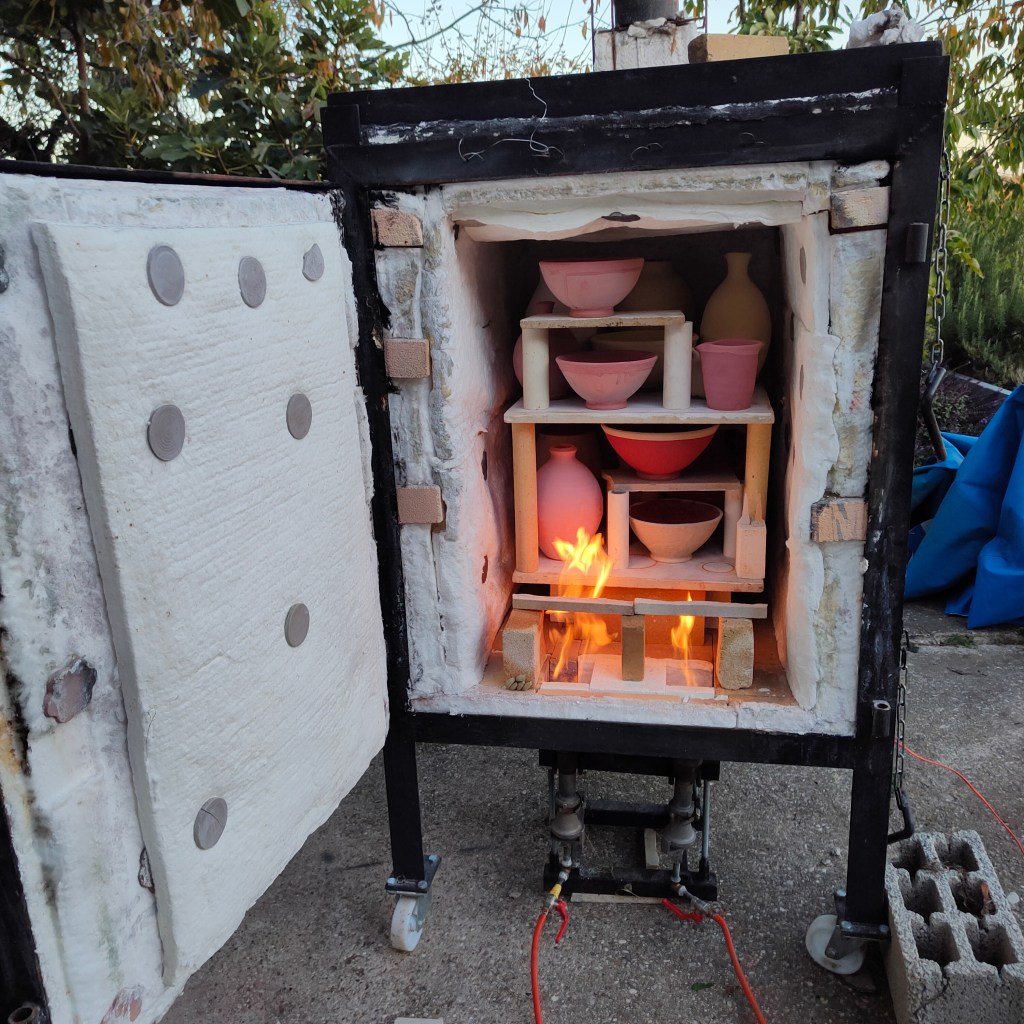
After my first firing I found that, while the vertical temperature difference was minimal, the ‘back’ end of the kiln (where the burners are positioned) was quite a lot cooler (barely cone 7). The front had got to cone 9+.
So I rebuilt the kiln chamber (which only took a couple of hours including cutting shelves and moving ports around etc) to match Iain’s dimensions: 4 bricks long by 10 bricks high by 3 bricks wide. On the second firing, this turned out to be much better. I got cone 9s down at the front of the kiln (chimney end) and cone 8 down at the back.
This also gave me better height for taller pots and more shelves. Reduction was good over the whole kiln, as long as I didn’t mess it up trying to hit top temp.
Late 2025 firing edit: I am now getting cone 10 quite evenly across the kiln. One has to be sure to not obstruct movement of gases with over-tight-fitting shelves.
A later addition saw me put an extra layer of bricks at the top of the chamber too, so it is 11 layers high. In firing No.4 I tried this and it made no major difference to the firing or fuel use! I imagine it has about 9cu ft/254 litres in kiln volume as a result. I have to take measurements and check that.
I do have some trouble getting enough pressure to get a reduction flame out of the bottom peep holes but the work has nearly all been well reduced. That lack of pressure maybe have been due to the slightly loose bricks (that expand and loosen in the firing), which could be partly fixed by locking it tightly in place with steel bracing. (I did this later. It didn’t fix the issue)
I find that visually checking kiln atmosphere helps – if the gases inside at high temps look ‘misty’ it’s a reduction atmosphere. If clear, it’s in oxidation. Obviously you want some flame coming out of the chimney to be sure of good reduction.
Flue set-up
The chamber obviously needs to connect internally to the chimney stack. For the flue passage, I first made it the size of the long side of 1 kiln brick. This gave an area of 160cm2 – more than the minimum needed for the kiln volume, which is around 130cm2. That was calculated with help from Iain’s website (referencing Fred Olsen’s kiln book). He cites Olsen as recommending “2.5 square inches of opening for each cubic foot.”
2.5 inches squared = 16.129 cm2.
7.94 (kiln volume in cu ft) x 16.129
= 128cm2.
Further, I know from previous experience that the flue should be a bit bigger than the burner ports combined. I did have that so it seemed good. (The burner ports were 2x 7x7cm (2 x 49cm2) so I had 98cm2 of burner port area versus 160cm2 of flue area.)
To support the chimney bricks over the flue, I cut a piece of kiln shelf to slot into grooves I cut in two of the bricks. I used some old pieces of insulating brick to fill the narrowed brick space above it (rather than cut a nice new brick. I hate doing that if I can avoid it).
However, during the start of first firing, I had a lot of smoking when on very low burner pressure, so I stopped the firing, opened it up and doubled the flue to the chimney and enlarged the burner ports. This fixed the problem – I think the larger burner ports was key since I had lots of air coming in to help combust the gas.
It now takes a few minutes for the flue to heat up to get a proper draw so it may smokes very slightly until then (with my DIY burners. I can’t open the air up so much on low gas pressure). I also move the burners back to maybe 8-10cm from the ports so more air can enter in the early stages. Once the kiln is hot I put the burners closer to the ports.
I didn’t have this issue on the old kiln because it had larger burner ports from the start and a long chimney creating plenty of draw.
Making the under-floor flue system
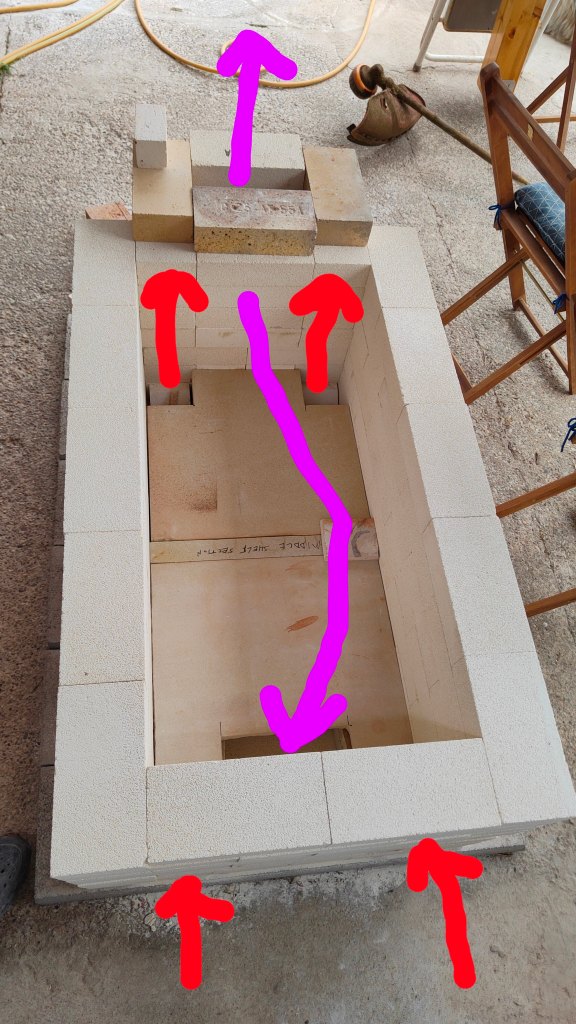
This is a downdraft kiln design, which means that the gases enter from the burner ports, go up over the pots and then go down (hence ‘downdraft’) and out a flue at the base level before rising up the chimney.
Iain came up with a closed floor shelf plan that guides the hot gases through the kiln – ideally meaning it will get fairly even heating and reduction throughout, and also maximising ware space. I had initially thought I would do a more traditional open floor design – with gaps around the floor shelves so gases will be allowed to circulate more freely – but when I was building it, I decided to follow Iain’s tried and tested plan. I can always open it up in future, if I want.
I did reach out to Iain and he said that there can be cooler spots in his kiln design – more towards the outflow hole in the floor (the opposite end from the chimney.) After firing the kiln, I find a 1 to 1.5-cone difference between front and back. That’s very manageable. Extra edit: In my most recent firing (Nov 2025), I had only one shelf in and the kiln rose easily to cone ten or 9.5 over the whole volume. It was a great firing with everything reduced. Shelf layout and/or pot size and positioning can definitely choke the kiln and make problems with airflow.
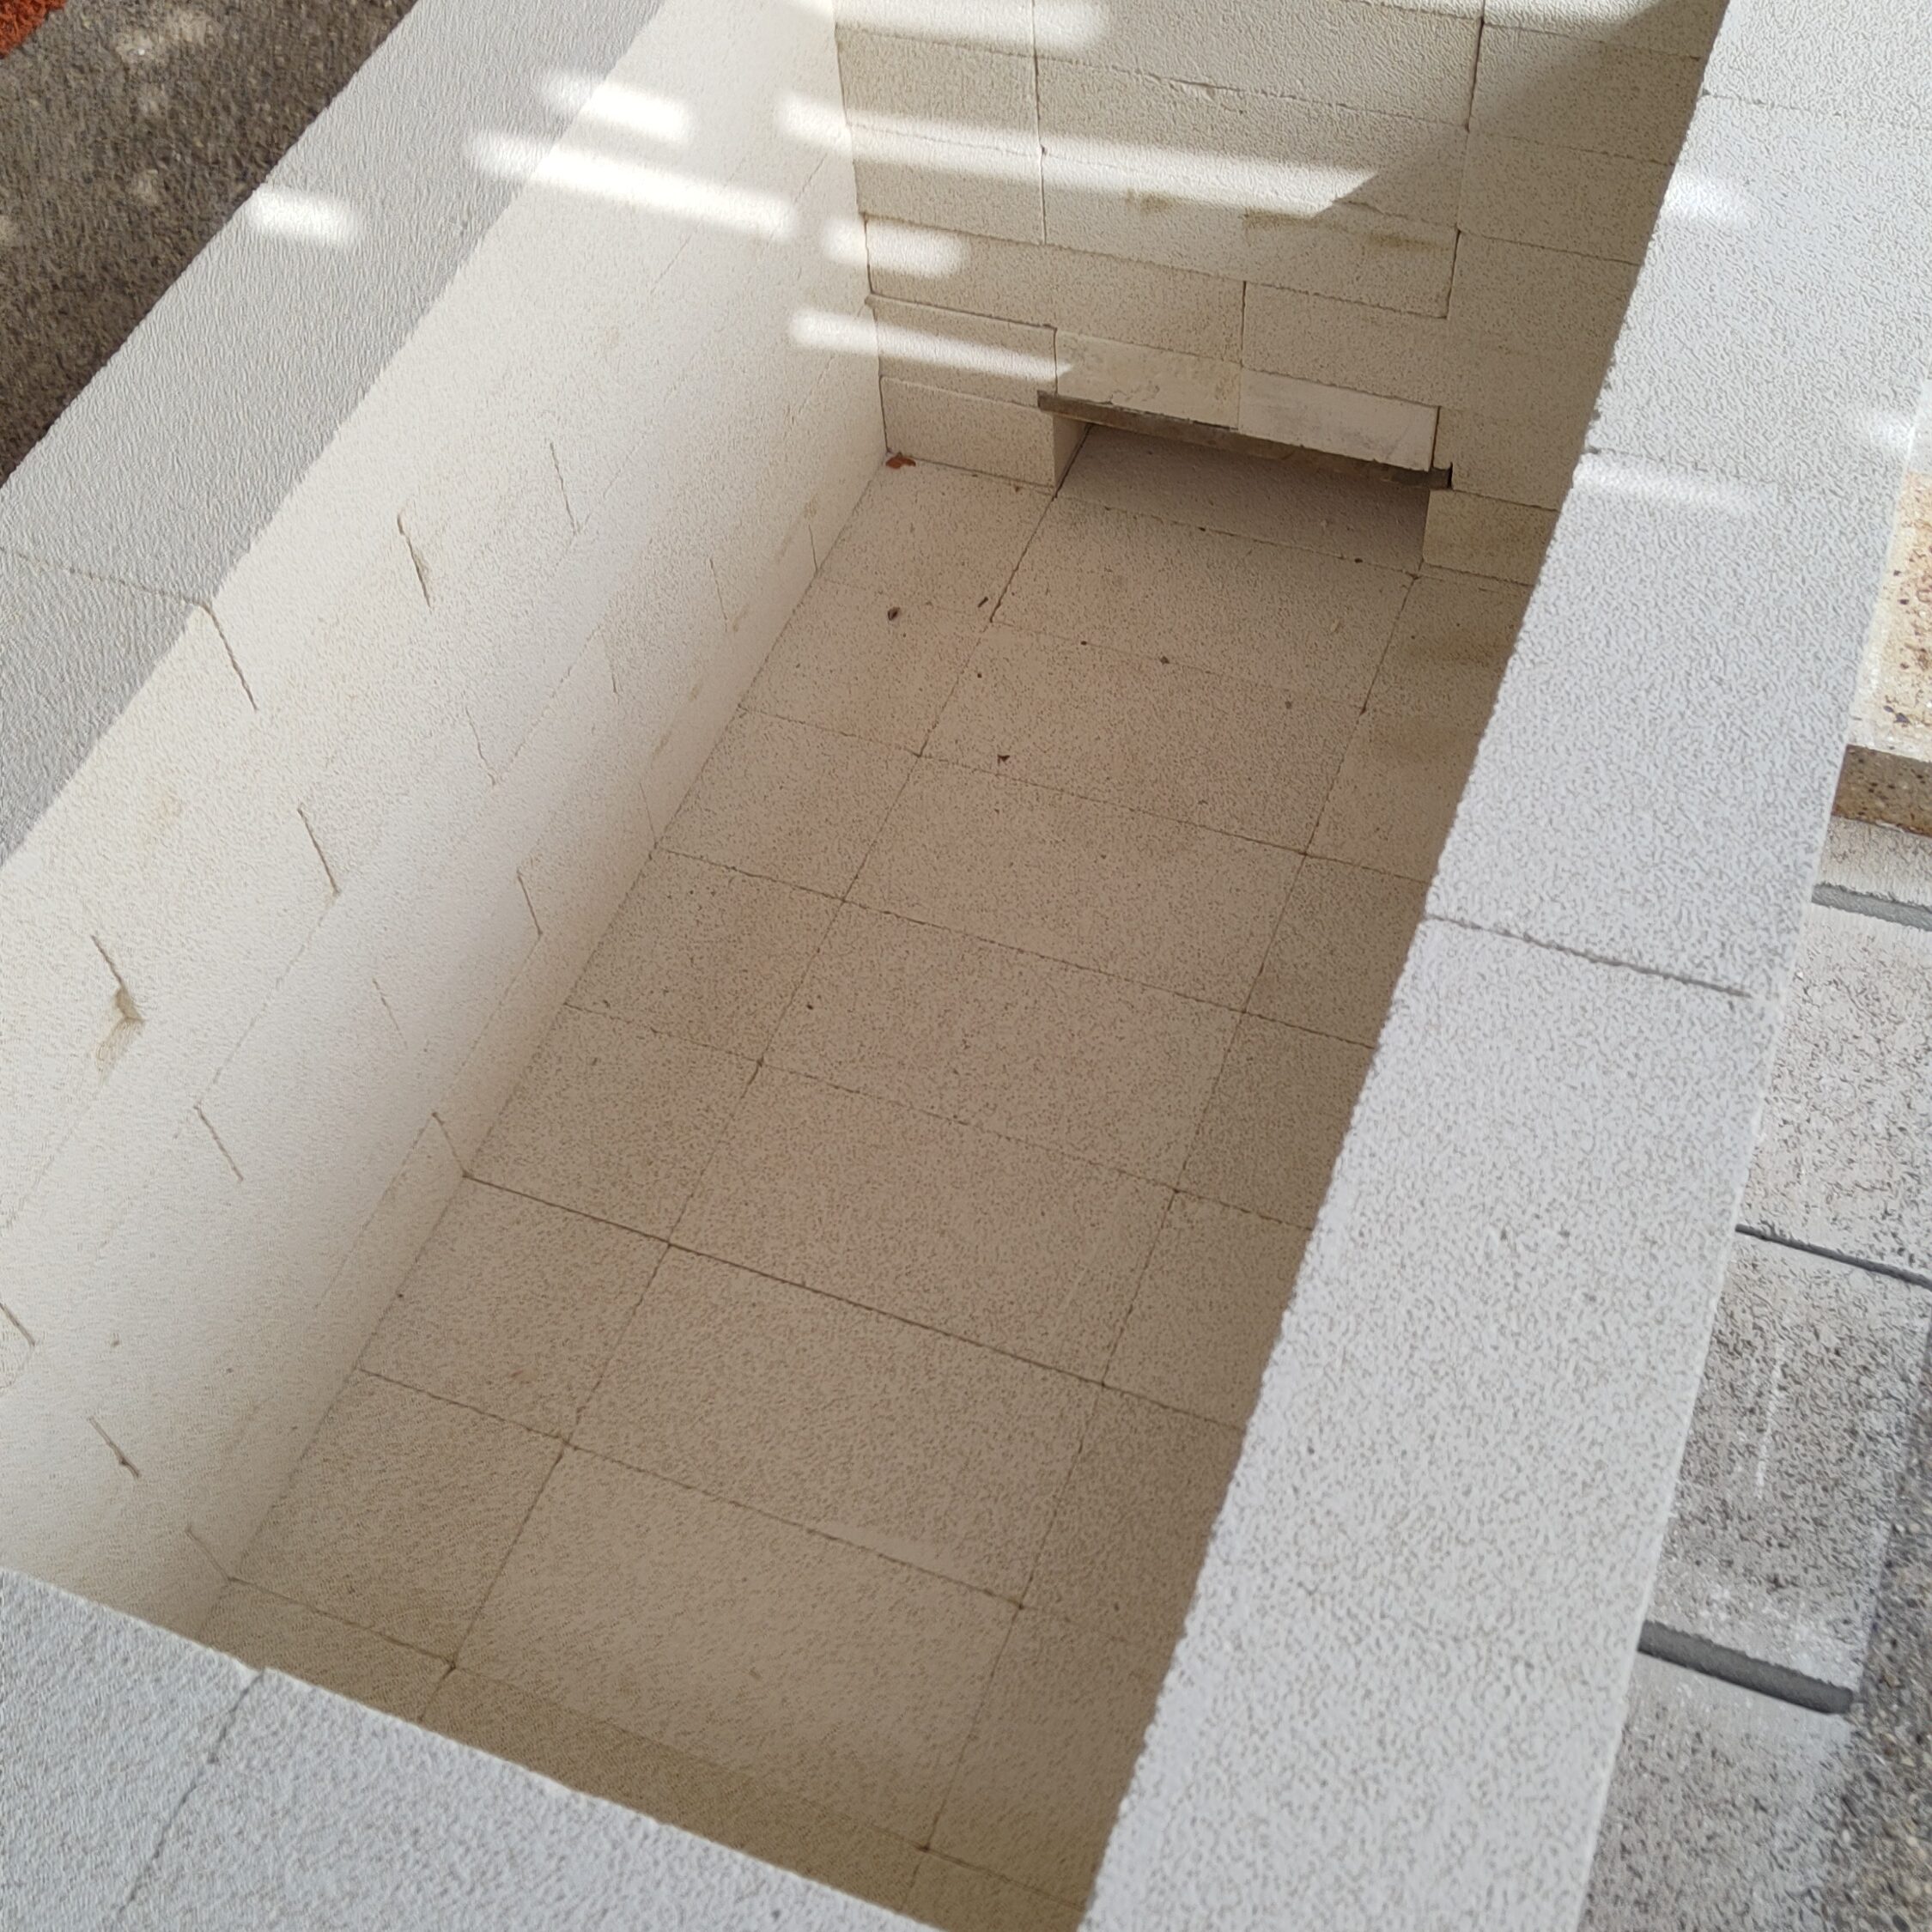
Making the floor initially involved cutting some 10cm-wide strips of kiln shelf and standing them on their edges to act both as supports for the floor shelves and to separate the incoming and outgoing gases.

From the two burner ports, two side channels allow incoming flame to flow under the floor and enter the chamber via two holes at the chimney end. A larger single hole at the centre of the other end allows the gases to leave after they have heated the ware, passing back under the floor to the exit flue.
The old shelves I cut up for this were 1.6cm thick – a bit thin to stand on edge and still be stable (especially since I cut them with an angle grinder. I had to level them with my big belt sander too). But they did stand and once the shelves were in place, they became very stable. The shelves sitting on them touch the walls, locking the whole structure in place so they can’t wobble over.
Because I was working from old pieces of damaged shelf I didn’t have long enough pieces to make four 50cm strips to run the full 100cm on each side with only one division in each. So I ended up with two short pieces at the burner end that weren’t filling me with confidence. I put a little ceramic fibre on top of these little uprights to more firmly jam them under the floor shelf. That looks to have done the job and they are locked in place.
No doubt, 2cm-thick shelf strips for the channel dividers and no short sections would be more secure.
On these supports one places shelves to form the kiln floor that are cut to provide the ports for hot gases to enter and exit the chamber. Once hot, the kiln’s draft pulls the gases through. The ‘in’ floor ports are about 10cm square and the ‘out’ port is slightly smaller than the chimney channel in area (the top side of 1 brick). That should be plenty for free movement of gases. When I rebuilt the kiln for firing No. 2, I made the latter hole a little smaller as I was wasting a little pot standing space.
I placed half bricks cut at 45 degrees in the ‘in’ channel ends to deflect travelling hot gas upwards into the kiln – a la Iain and originally, I believe, inspired by Simon Leach kiln builds.
My one concern with this floor system was that the shelves could crack with direct contact with the flame before the chamber has got sufficiently hot. In the actual firings, I found this not to be the case. I did try to keep the temperature rise gradual to avoid this issue.
Iain seals the floor shelves around the edges and joins. I don’t feel the need to do this. A small amount of heat leaking into the chamber early will not hurt anything (the gap between the floor and walls is tiny). I may yet do this to better seal the kiln for consistent reduction.
Cutting in burner ports
I originally tried to cut the burner ports with a circular cutter on a drill. That failed since it would only cut a few cm into the brick and, even with cutting in from the other side, I couldn’t make the tool cut all the way through.
After faffing around trying to extend the circular holes with hand tools, and just making a mess, I ended up cutting out roughly 7cm square holes which do the job just fine. The extra gaps around the burner heads will allow more air into the kiln to help combust the gas. As burner expert Mark Ward says in this very useful essay, a kiln must breathe.
As mentioned above above, I had to further enlarge the ports to more like 10cm square during the first firing because the low chimney meant little draw and smoking from poor combustion of gas. They are actually rectangular now due to the max height of a brick.

Chimney stacking
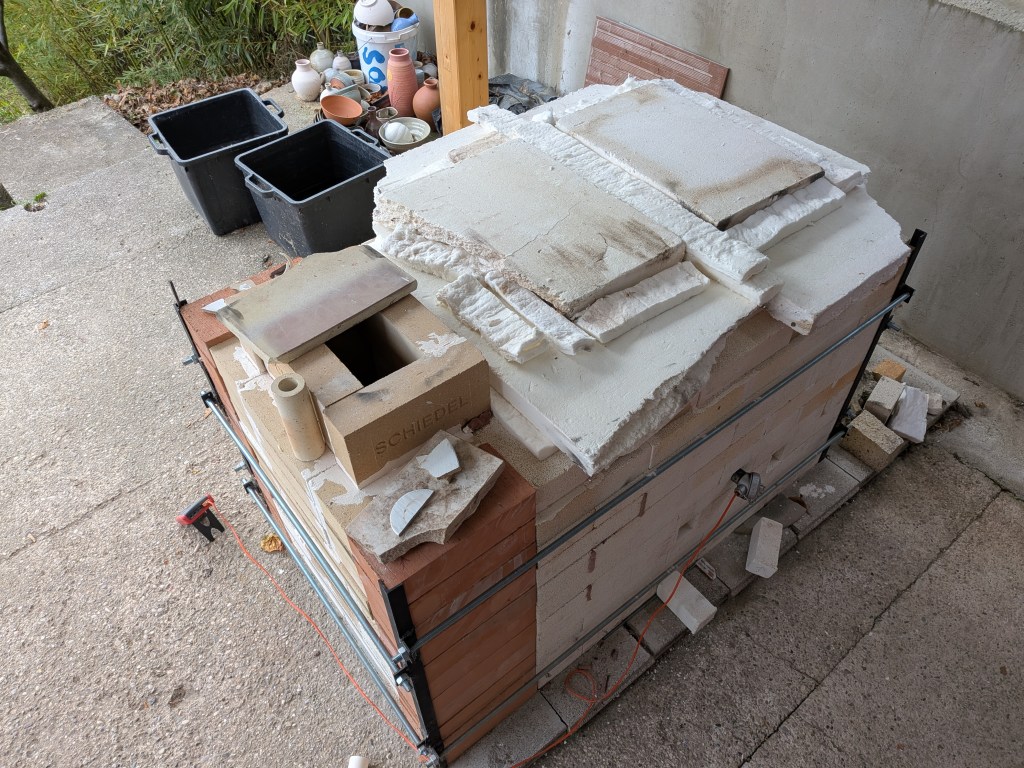
The chimney is a simple stack that has a hollow interior the area of 1 brick on its largest side. Iain does this in his design, so I did the same.
I have added an extra layer of side-up bricks at the top of the chimney (compared with Iain’s design which stops flush with the kiln chamber). This should increase the draw through the kiln and further allow me to have a tighter flue if needed by moving one of the bricks inwards.
For fine control of oxidation/reduction, I place a piece of kiln shelf on top as a damper to be able to easily open and close the top. Of course, my Venturi burners also have air control wheels for this purpose. One uses both methods in a firing, but it is mostly done on the damper once reduction has started.

Ports for peeping and pyros
To finish the kiln body, I opened three peep holes in one side wall to allow me to check cones and the kiln atmosphere. (If you get a yellow flame out of the peeps, you have reduction and sufficient internal atmospheric pressure.) Two are just above floor level to give views of cones on the bottom shelf (placed towards both ends of the kiln to monitor hotter and cooler ends, potentially). The third peep I put above the top shelf level and towards the chimney end.
For the peep-hole bungs, I used some insulating brick sections I had left from earlier projects. These are filed to fit and very slightly tapered at the inside tip to easily slot in without dislodging bricks in the hot later stages of the firing.
I gave the bungs a little raised rim on the outside ends so they won’t slide into the peep hole too far, and providing finger grips to make them easy to extract when the kiln is hot (also an idea from Iain).
When I rebuilt the kiln for firing No. 2, I moved 1 peep hole to the other side to be able to make sure both sides had reached temp.
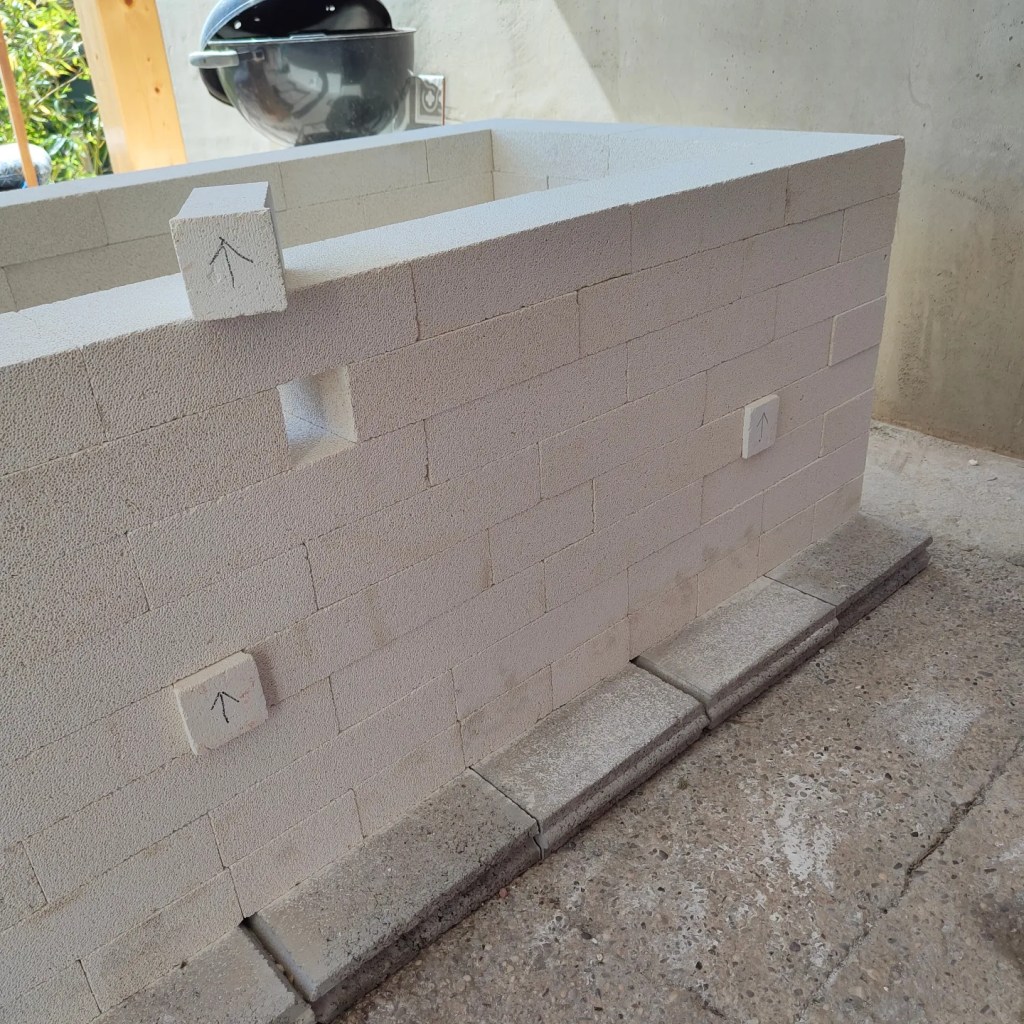
I drilled two 1cm holes for my thermocouples (high-temp digital thermometer probes) in the wall opposite the peeps. Since I have two (K and S-types), I thought why not use both? It can be really insightful to track the variance in temp between top and bottom and see how gas level effects any difference. These again are sited high and low and towards either end of the kiln.
This proved very useful. In the first two firings I could see if top or bottom was higher. For the second firing, I also moved one thermocouple to the other side so I could track left and right and was able to adjust the burners to keep the climb rates close.

The roof conundrum
The roof is generally the trickiest part of building any kiln.
You either:
- Build a brick arch – very tricky, needs a lot more bricks and metal bracing, and generally only worth the effort for a kiln that is bigger and will never need to be moved (mine will).
- Bind a bunch of bricks firmly together into a flat top so they won’t fall into your pots at high temp – also a little tricky and very heavy to lift off if you don’t have a structure to hinge it on or to attach a pulley system to.
- Or you make a flat top of something lighter and not prone to collapse – either fibre blanket on a metal frame, or fibre board, or kiln shelves + fibre blanket over.
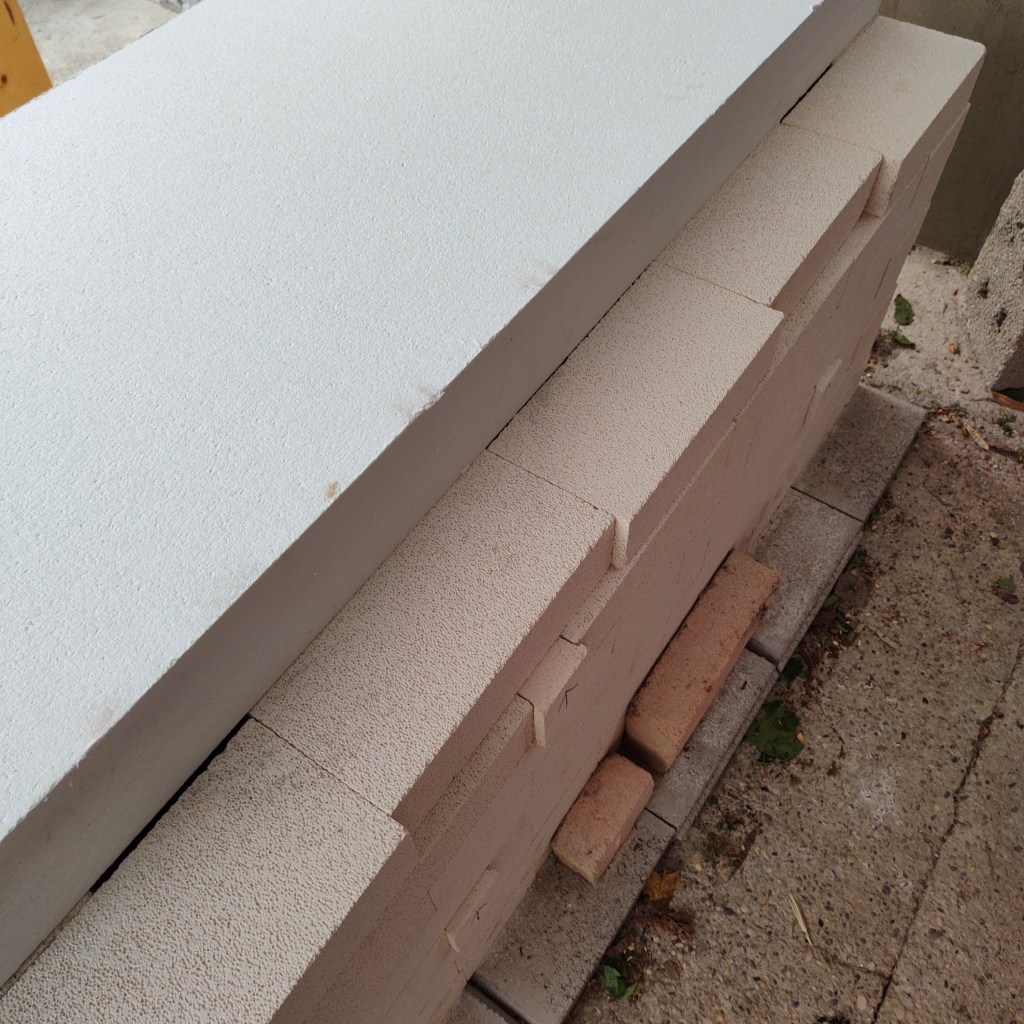
Wanting something less prone to sagging and disintegrating than fibre, and not being able to source fibre board rated to over 1300C in the EU (or so I thought…), I opted to go with shelves for the roof and ordered two of 50x60cm for 1300C.
To hopefully sidestep the issue that shelves can crack from thermal shock if the edges are exposed and hence cooler than the centres, I planned to sit the shelves in a cut groove on the inside of the uppermost chamber bricks. That would allow the kiln’s heat to pass right to the extremities, lowering the risk of cracking. Fibre blanket would be laid over the whole top to insulate the roof.
But then I got a reply to an email I sent to UK-based refractories maker Vitcas (where Iain sourced his fibre board). They sell 25 and 50mm fibre board rated for 1430C and can ship to the EU from their plant in Poland (I live in Croatia). It was a very reasonable 150 euros for a 50mm-thick board of 100 x 120cm, but a hefty 120 euros for shipping! I bit the financial bullet and ordered it anyway because board wouldn’t (or so I thought!) have the cracking issue of shelves or pose the breathing hazard and sagging issue of fibre with repeated use.
I later realised the shipping cost was high because the board comes on a wooden pallet to protect it from breakages.
One board is way more than enough to cover my kiln, and in fact, by cutting it in half (producing two sections of 50x 120 cm), I had just enough to double it up for 10cm of insulation.
The cut sections overlap with the brick walls at the chamber ends, but there’s no overlap at the sides. So I corbelled (offset) the top side-wall bricks inwards by 2cm-ish, meaning the board has support all round. I still have slight gaps in a few places where I can’t offset the bricks without cutting bricks. I later did fix that for firing No. 3, corbelling bricks all along the sides. When firing, I also put strips of fibre blanket under the board edges so as to maintain good insulation and seal.
If you have the board a bit wider, you won’t need to offset the bricks. I do recommend the fibre blanket gasket around the edge to seal it better, as the board curves a little in firing.
To divide the board, I used a thin and very sharp knife, trying to cut right down the centre line at 90 degrees, as I had no extra material to allow for wandering cuts. This is a really hard task, as the board is not at all easy to cut. By far the hardest job of the build!
I didn’t know how structurally strong the board was, though it seemed good and tough. It abrades quite easily if you slide it on rough surfaces, so one has to carefully place in in the right position as much as possible.
However, after the first firing, I found the lower board had curved due to heat differences and varying shrinkage. Worse, it had formed a crack. In the second firing it actually broke when I lifted it off the kiln! I now have one good board to try not to break or bang goes 300+ euros! The larger broken piece is just long enough to cover the chamber space sitting on top of the lower board for double insulation.
I think I would recommend fixing the board in a steel frame so it has support and doesn’t crack. One would need to cement it in the frame or use ceramic buttons and high-temp wire. I may yet try and do this, though my board is in quite bad condition after 4 firings.
Note: Iain took the flat-top option for his kiln, using very long bricks locked together with steel bracing. On a build for another potter, he used fibre board held in a steel frame, adding coils of high-temperature rope to make a seal beneath.
Update after firing no.3
Here’s where I opted to cut pieces out of a couple of bricks to allow me to corbel all the side bricks inwards a little, to support the fibre board all the way along the sides, and give a better seal during firing. The picture below shows where I cut the two bricks I cut to give room for the side bricks to slide inwards. I cut about 4cm off each (one at each end), allowing movement of 2cm on each side.
I also opted to swap out two soft bricks and put in two hard bricks on each side. This was to bring greater stability when the board was on top in the firing. The light soft bricks had a tendency to start tipping slightly when its weight was on the inner edge. The much heavier hard bricks seemed totally stable and didn’t make any noticeable difference to the insulative properties of the kiln.
Heat source
For heat, I have two Venturi gas burners that I built myself. These work pretty well but are a bit carbon rich on low pressures (as mentioned). I have no idea of the thermal output, but they fired my previous kiln of a similar volume to high fire temps. They have no safety cut-off system though, so I basically have to monitor the kiln at all times.
*I recommend spending the extra on burner safety systems that will switch off the gas if the burner blows out. If that happens with an unattended kiln before the interior is red hot, it can cause an explosion. You can also pay more and get burners with a pilot light so they reignite automatically.
Note: Iain uses free-standing Rohde 30kW burners with flame cut-off.
Final things

I gave all the shelves a good coat of shelf wash to help protect them from runny glazes. The cut floor in particular is it worth really looking after, as I won’t want to be cutting more shelves for it more than very rarely. I use clay cookies and small bits of shelf if I am worried a glaze might run.
Of course, some ash glazes ran off the pots onto the shelf in the first firing 🙂
If I had all the materials in place at the start, and had the energy and the knowledge of the build’s intricacies, it would have been less than a day to make. In reality, the build spanned a couple of hours a day over several days, plus I had to wait a week or so for the fibre board to be delivered.
Costing the build
This build is pretty cheap for a 225 litre gas kiln. That’s relative, of course. But if you look at commercial gas kilns of similar volume they will cost 5-6,000 euros for a top-loader to 10,000+ euros for a front loader.
My 150 x 1430C bricks cost me 880 euros inc. delivery (plus a few I already owned). The kiln body actually needs 151 or 152, I think, if one finishes the chimney flush with the chamber. I used 5 hard bricks for that extra level. I only cut new bricks to make the burner/peep holes and for slots for the flue. Best allow a couple extra for cutting port bungs, breakages, and things I forgot to mention.
For the interior floor structure you need 3 shelves (I used 50 x 60 x 1.6 cm rated for 1300C+/2372F+) – two for the floor itself, and one to cut into strips for channels/supports (best to use an old, abused shelf for this if you can). These will likely cost about 70-80 euros each new. My fibre board roof cost 150 euros, as mentioned.
My burners I made very cheaply (maybe 20 euros each). New commercially made burners would cost around 330 euros each if you buy them with flame safety cut-off (recommended).
So, to build this kiln as I did with all those items purchased new, it would total around:
800 euros (bricks)
150 euros (50mm fibre board roof)
240 euros (3 shelves)
660 euros (2 burners)
= 1,850 euros (US$2,000).
Give or take. I didn’t include any shipping. Oh and a bit more (40 euros?)for the concrete blocks for the base.
For actually using the kiln, you’ll need a decent thermocouple and controller. And shelves and props for the ware during the firings. That brings the grand total up to maybe 2,400 euros ($2,600) approx. all in, though your costs may vary from mine – especially if you can source bricks or burners secondhand.
I didn’t include any metal kiln bracing in this calculation – but it’s very cheap if you can weld it yourself or pay a friend to in beer. Just some angle iron and threaded bars (see Iain’s blog for details).
In mid-July 2024, after firing No. 4, I did add some bracing to reduce leakage when firing in reduction, as well as kiln safety. The cost of metal materials was about 36 euros – some angle iron and some threaded rods and bolts. A few hours were spent welding lugs on the sections of angle iron (all cut with an angle grinder), and after a spray with high-temp black paint, it was all fitted to the kiln and tightened up.
I added some cheap house bricks to the corners around the chimney (cost for 22 pieces about 30 euros). These make the kiln a full rectangular form and much easier to fit a frame to.
I have a post on the first firings here and another blog post looking at how my pottery firing CO2 emissions compare with taking a plane or running a car and it is surprisingly little.
Very happy with this kiln!
If you made it this far. Well done! Haha. Thanks for reading. I would be happy to read any comments you have on the build.

Hi Dan,
Thats really interesting. I hadn’t realised the process of kiln building was so intricate and specialised. Thank you for sending it to me. Please put me on the subscribers list for future blogs.
Much love to you and the boys,
John
LikeLike
Yeah, kilns are simple insulating boxes in one sense but the dynamics have to be just so to get the right atmosphere control and temperature.
I think you are on the mailing list from the previous comment since you got this one
LikeLike
Hy Dan!
thank you very mu h for sharing your process building your kiln. I’m planning my first one, that ideally will be in bricks, but I am still thinking about addapt my project to the fiber blanket one because of the difficulty of shipping for the place that I am.
But
I dont know what curve of fire you use, but aprox, how much litters of gas do you use to bisque, like cone 08, or for a cone 4 in this kiln?
thanks!
LikeLike
Hi Luana
Thanks for your comment.
I mention the amount of gas used in my cone 8-9 firings in my other post on firings in the kiln: https://danpalmerceramics.com/2024/07/14/first-firings-in-my-new-gas-kiln/
Basically I use about 2 x 10kg bottles of gas over about 8 hours. I think now I have locked the bricks in tightly with a steel frame it might be a little more efficient, but I will see next firing.
I do my bisque firings in an electric kiln. I used to use my old gas kiln but it is easy to make a mistake in daytime and go into reduction if you aren’t really careful (you can only see the reduction flame at night). You want to have a very ‘clean’ (low carbon) atmosphere for bisquing – especially for iron clay pots or you can get problems with blistering, black coring etc in the later glaze firings. Still, it is possible to do it in a gas kiln if you are very careful to make it an oxygen rich atmosphere (blue flame at the burners, and chimney damper open). You don’t want flame or smoke coming out of the chimney and ports!
I would think a bisque firing would be about half the amount of gas as my high firing, maybe 10kg in my kiln, at a guess. I haven’t fired to cone 4 either, at a guess maybe two-thirds of my high firing (approx. 13kg gas). But this is really just guesswork, sorry.
I would recommend brick if you can get it. Can you persuade a friend with a van to collect bricks for you? Shipping would be a lot for such a large weight of bricks.
Otherwise fibre is totally going to make a good kiln. You just need a metal frame to pin the fibre on using high temp wire and ceramic buttons. Look up ‘flat pack kiln’ on Google for some examples. Remember that fibre is a potential health hazard and to wear a mask when cutting it and building the kiln.
Good luck with the build!
LikeLike